windows单机部署(开发版本)
安装包下载
nginx下载地址:[https://www.nginx.org/download/nginx-1.3.7.zip]
php下载地址:[https://windows.php.net/downloads/releases/php-5.3.18-nts-Win32-VC9-x86.zip] (VC9 x86 Non Thread Safe 5.3.18 zip windows)
mysql下载地址:
[https://www.mysql.com/downloads/mirror.php?id=409760](windows 32位)[https://www.mysql.com/downloads/mirror.php?id=409777 ](windows 64位) 【下载时要登录,如果可以,就自己注册用户。已经注册好的用户:1051292443@qq.com anjiaxin】
配置手册
- 在nginx官网下载最新版本1.3.7的zip包,在php官网下载5.3.18版本的包
- 将nginx和php解压放在e盘中,最好是同级目录(只作为建议,为修改配置文件方便,我的目录是e:/nginx;e:/php;e:/mysql;)
- 配置php,内容如下:
- 将php根目录下的“php.ini-development” 文件改名为“php.ini”
- 配置php的扩展,在php.ini中找到以下的内容,将前面的分号“;”去掉
extension_dir="e:/php/ext" ;extension=php_bz2.dll ;extension=php_curl.dll ;extension=php_gd2.dll ;extension=php_gettext.dll ;extension=php_mbstring.dll ;extension=php_mysql.dll ;extension=php_mysqli.dll ;extension=php_openssl.dll ;extension=php_pdo_mysql.dll ;extension=php_sockets.dll ;extension=php_xmlrpc.dll - 指定工作目录,在php.ini中找到“doc_root”把你的工作目录路径赋值给“doc_root”
例如:doc_root="e:/www"
- 更改时区,在php.ini中找到‘date.timezone’给他赋值为‘prc’
- 将以下文件复制到指定的目录
1、将‘php.ini’文件复制到“C:\windows”目录下面 2、将php根目录下面的文件“libeay32.dll, ssleay32.dll”复制到“C:/windows/system32”目录下面 3、将‘php/ext’目录下的文件“php_curl.dll,php_openssl.dll”复制到“C:/windows/system32”目录下面 - php配置完了,需要配置一下环境变量,步骤如下:找到环境变量(例如:windows xp 我的电脑右击->属性->高级->环境变量),具体如图:

- 配置nginx。内容如下:
- 编写启动nginx和php进程的bat文件,名称是:start_php.bat,放在nginx的安装目录的根目录下,内容如下:
@echo off echo Starting PHP FastCGI... e:/php/php-cgi.exe -b 127.0.0.1:9000 -c e:/php/php.ini - 编写关闭nginx和php进程的bat文件,名称:stop_nginx.bat,和启动文件同目录,内容如下:
@echo off echo Stopping nginx... taskkill /F /IM nginx.exe > nul echo Stopping PHP FastCGI... taskkill /F /IM php-cgi.exe > nul exit - 打开conf/nginx.conf,配置nginx,以下是配置好的文件内容,请对照配置自己的文件。
    #user  nobody;
    worker_processes  1;

    error_log  logs/error.log;
    #error_log  logs/error.log  notice;
    #error_log  logs/error.log  info;

    #pid        logs/nginx.pid;


    events {
        worker_connections  1024;
    }


    http {
        include       mime.types;
        default_type  application/octet-stream;

        #log_format  main  '$remote_addr - $remote_user [$time_local] "$request" '
        #                  '$status $body_bytes_sent "$http_referer" '
        #                  '"$http_user_agent" "$http_x_forwarded_for"';

        #access_log  logs/access.log  main;

        sendfile        on;
        #tcp_nopush     on;

        #keepalive_timeout  0;
        keepalive_timeout  65;

        #gzip  on;

        server {
            listen       80;
            server_name  localhost;
            root        e:/www;

            charset utf-8;

            access_log  logs/host.access.log;

            location / {
                root        e:/www;
                index  index.html index.htm index.php;
                autoindex on;
            }

            #error_page  404              /404.html;

            # redirect server error pages to the static page /50x.html
            #
            error_page   500 502 503 504  /50x.html;
            location = /50x.html {
                root        e:/www;
            }

            # proxy the PHP scripts to Apache listening on 127.0.0.1:80
            #
            #location ~ \.php$ {
            #    proxy_pass   https://127.0.0.1;
            #}

            # pass the PHP scripts to FastCGI server listening on 127.0.0.1:9000
            #
            location ~ \.php {
                include        fastcgi_params;
                set $path_info "";
                set $real_script_name $fastcgi_script_name;
                if ($fastcgi_script_name ~ "^(.+\.php)(/.+)$") {
                    set $real_script_name $1;
                    set $path_info $2;
                }
                fastcgi_param SCRIPT_NAME $real_script_name;
                fastcgi_param PATH_INFO $path_info;
                fastcgi_param  SCRIPT_FILENAME  $document_root$fastcgi_script_name;
                fastcgi_pass   127.0.0.1:9000;
                fastcgi_index  index.php;
            }

            # deny access to .htaccess files, if Apache's document root
            # concurs with nginx's one
            #
            #location ~ /\.ht {
            #    deny  all;
            #}
        }
    }
以上配置文件中有很重要一点需要说明一下: 1、文件中"root e:/www;" 和php.ini中的”doc_root="e:/www"“ 路径必须是一致的,负责无法解析php文件 2、文件中以下代码是为了配置nginx解析"pathinfo"函数 set $path_info ""; set $real_script_name $fastcgi_script_name; if ($fastcgi_script_name ~ "^(.+\.php)(/.+)$") { set $real_script_name $1; set $path_info $2; } fastcgi_param SCRIPT_NAME $real_script_name; fastcgi_param PATH_INFO $path_info; - php和nginx的连接需要以下的重要配置,请依照以下代码来修改php.ini中的代码
    enable_dl = On
    cgi.force_redirect = 0
    cgi.fix_pathinfo=1
    fastcgi.impersonate = 1
    cgi.rfc2616_headers = 1
    allow_url_fopen = On
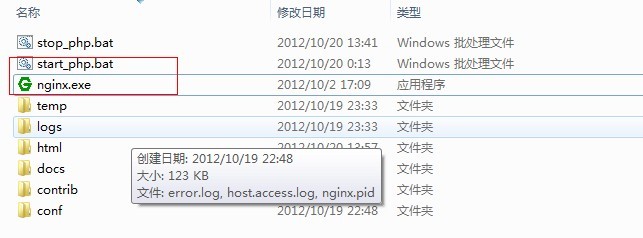
到这里php+nginx算是配置完成了,在您的工作目录写入info.php,然后启动nginx和php。启动方法如下图所示的文件双击:
- 在浏览器地址栏输入"localhost/info.php",info.php 文件如下
    <?php
        phpinfo();
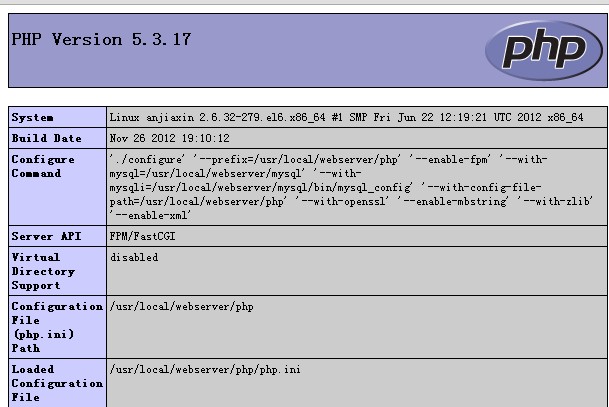
如果出现以下内容说明配置成功了。
- nginx配置到这里还有一点点缺陷,在这里补充以下一点
在配置完nginx后,有两个启动文件"start_php.bat"和"nginx.exe",而且php启动后会有一个显示框,感觉不是很舒服,有以下方法可以解决这个问题
下载一个脚本文件"RunHiddenConsole.exe",RunHiddenConsole.exe的作用是在执行完命令行脚本后可以自动关闭脚本,而从脚本中开启的进程不被关闭。

RunHiddenConsole下载地址:[https://redmine.lighttpd.net/attachments/660/RunHiddenConsole.zip]

下载完了解压,把"RunHiddenConsole.exe"放在和"nginx.ext"文件同级的目录
修改"start_php.bat"文件,修改后的文件内容如下:

@echo off
echo Starting PHP FastCGI...
RunHiddenConsole E:/php/php-cgi.exe -b 127.0.0.1:9000 -c E:/php/php.ini

echo Starting nginx...
RunHiddenConsole E:/nginx/nginx.exe -p E:/nginx
- 编写启动nginx和php进程的bat文件,名称是:start_php.bat,放在nginx的安装目录的根目录下,内容如下:
- 配置解密工具“Zend Guard Loader”,工具下载地址【[https://www.zend.com/en/download/417] (Zend Guard Loader (Runtime for PHP 5.3))】
- 在php.ini中加入如下配置代码:
[zend.loader] zend_extension = "E:/php/ext/ZendLoader.dll" zend_loader.enable = 1 zend_loader.disable_licensing=0 zend_loader.obfuscation_level_support=3 zend_loader.license_path= - 重启nginx和php,查看info.php,出现如图所示的,证明配置成功

- 在php.ini中加入如下配置代码:
- 配置mysql
    mysql的配置方法很简单,下载安装包,根据提示一步步进行就可以完成
    mysql端口默认3306
linux 部署
- 开发环境linux的配置可以参考标准版lnmp配置,根据自己的需求,缩减掉memcache和mongo
- 开发版本ecstore部署
ecstore安装
ecstore ego版本的代码是有加密的,所以首先要配置解密工具,其次是获取授权文件,最后才能成功安装ecstore,具体步骤如下
- 授权文件
- 获取ecstore源码安装包
- 解密文件 developer.zl在安装包中/config/developer.zl下,配置php.ini文件。
;zend_loader.license_path=
zend_loader.license_path=***/config/developer.zl
- 重启nginx 和php_cgi
- 安装ecstore(dos命令行安装 和 网页安装)
- 手动安装采用的是dos命令安装,这个可以查看文档[/quickstart/notebook/new-project.html],文档里有具体的安装操作步骤
- 网页安装是通过网址解析路由来安装,安装网址是您网站的域名后跟”index.php/setup“,例如”localhost/ecstore/index.php/setup“